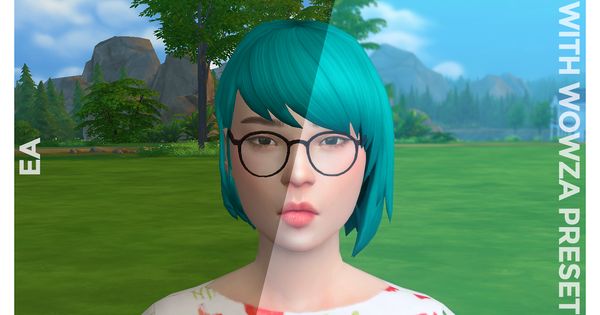
Reshade for the Sims 4 can truly transform the visual experience of your game. No matter what kind of look you’re going for, there’s a preset out there that will suit your needs.
Whether you’re going for a girly fashion shoot, a dark storytelling series, or warm and cozy postcard pictures, you can easily tweak the way the game looks while you’re playing it.
Keep reading to discover the easy steps for installing reshade in Sims 4!
Let’s Get Some Serious Reshade For Your Sims
Reshade enhances your gaming experience by applying a variety of effects to your favorite games.
These effects include adjustments to color saturation, brightness, hue, depth of field, and more.
It has the ability to completely transform the appearance of your game, giving it a more realistic, visually impressive, charming, edgy, or any other style you desire based on your input.
This tool is incredibly powerful!
Even though reshade is classified as a mod, it doesn’t follow the usual mod installation process since it functions as a separate injector.
It’s important to note that the process of extracting and copying the file to your Mods folder is not as straightforward as it may seem.
Instead, you’ll need to follow a set of steps to make it work.
Download and Install Reshade For Sims 4
For a smooth start, head over to the Reshade website and simply follow the links to download the executable file.
It’s important to keep track of the file version because not all presets are compatible with every version. You might have to go back to an older iteration to make your desired preshade adjustment work.
After you’ve successfully downloaded the reshade mod, let’s proceed with the installation process:
- Locate and open the “Reshade.exe” file. The location of the mod in your browser’s download folder may vary. Typically, the Downloads folder is easily accessible through C:\Users\YOUR COMPUTER NAME\Downloads.
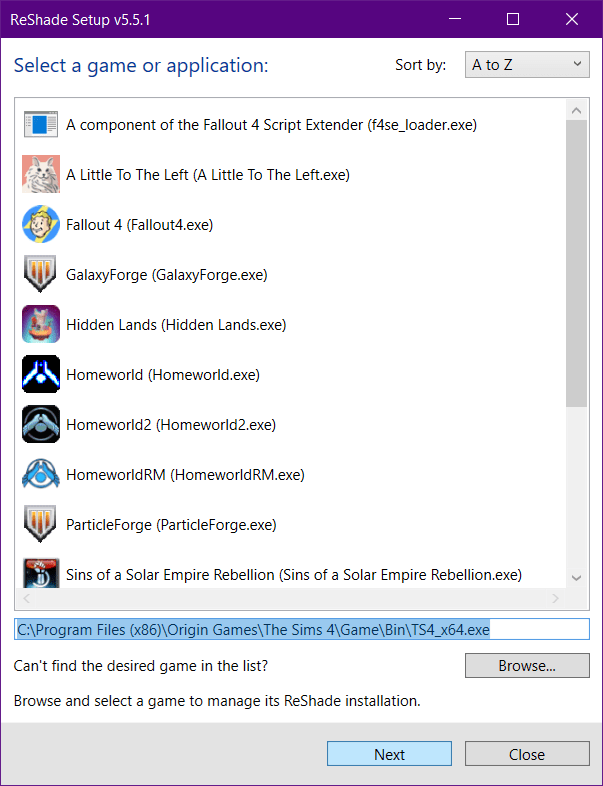
- Choose your game. When using Reshade on different games, it’s important to choose the correct one. Discover the location where your Sims 4 game is installed, which is typically in the C: drive for most users.The directory path you are looking for is: \Program Files (x86)\Origin Games\The Sims 4\Game\Bin. You’ll want to choose the .exe version here.
- Opt for Direct3D 9. After you’ve made your game selection, you’ll be prompted to choose between Direct3D 9, Open GL, Vulcan, and other options. For The Sims 4, all you have to do is select Direct3D 9. It’s as simple as that!
- Please choose the effects you would like to include in your game. To greatly expand your options for altering the appearance of the Sims 4, it is advisable to choose all of the effects from this list. Due to the intensity of certain effects, they might cause slower machines to experience performance issues. However, to fully enjoy the benefits of Reshade, it is recommended to enable all options.
- Just click OK a few times and download everything. The program will autonomously download all necessary files for the selected options. This process should be quick and easy.
- Feel free to download and install some presets. After you’ve extracted the files, just go ahead and copy the downloaded preset(s) into the same directory where you initially installed Reshade: C:\Program Files (x86)\Origin Games\The Sims 4\Game\Bin. Presets should be placed in the Bin folder!
- Please start up The Sims 4. Reshade will start loading and display its progress at the top of the game screen. Feel free to click on menu items while the progress bar is running, allowing you to start loading the game while the injector finishes preparing.
- Choose your preferred preset using the Reshade program. Reshade provides a wide range of options for configuration, and it may require some time to explore the menu and become acquainted with its full capabilities. I strongly recommend doing the tutorial that appears when you first launch Reshade to familiarize yourself with it.
Tips and Tricks
Due to the impressive capabilities of the Reshade utility, it may require some initial familiarization to navigate smoothly. Here are a few suggestions to ensure a seamless experience:
- Keep in mind the difference between gameplay and photo presets. A lot of players enjoy using Reshade to capture in-game photos, and the presets they choose can really transform the game’s appearance. When using Reshade during gameplay, some of the more intense presets may cause your game to slow down and make navigation challenging. Optimize your gameplay experience with presets designed to minimize intense effects.
- Customize your shortcut keys to enhance usability. Within the Settings→General section of the Reshade menu, you have the option to assign keys for various actions. These actions include toggling your preset on/off, cycling through all preset options, and refreshing effects, among others. It’s a breeze to use keyboard shortcuts instead of constantly going to the overlay menu whenever you need to activate or modify the preset.
- For those of us who prefer playing with our computer keyboards, it’s important to avoid assigning any shortcuts to keys that are already used for other in-game actions! For instance, I utilize the “home” key to display walls, which conveniently doubles as the key to toggle the overlay menu. Using a different key will stop the menu from appearing every time I try to raise my sims’ walls.
- Make sure to capture the correct screenshots! Pressing the “C” key while playing the game allows you to capture photos using the in-game camera. Importantly, the preset effects are not applied to the captured images. To ensure that the effects appear in your photos, it is recommended to use the PrntScrn key. Reshade conveniently saves these screenshots in the same folder where everything else is installed: C:\Program Files (x86)\Origin Games\The Sims 4\Game\Bin. In the Settings menu, you have the option to modify the save location.
- By default, Reshade will be enabled when you start the game. To ensure a more enjoyable gameplay experience, remember to switch to a preset that is optimized for gameplay before exiting. This way, when you launch The Sims 4 again, the visuals won’t appear overly distorted.
Final Words
Reshade for the Sims 4 can truly transform the visual experience of your game.
With some preparation and knowledge, you’ll become a Reshade expert in no time, adding fun and funky effects to the world of the Sims!